Lost Origin will bring a lot of new ways to play in the standard format, and I’m not just talking about new cards. The Lost Zone mechanic is back from its break since the Sun and Moon block and a lot of new viable cards uses it to attain some really great effects.
Hisuian Goodra VSTAR doesn’t use the Lost Zone mechanic to its advantage, but a lot of cards that supports it do. Goodra VSTAR’s attack reduces the damage it would receive during the opponent’s next turn. This damage reduction can be stacked with other similar effects to make Goodra a living tank. Its VSTAR Power is an Ability that heals every damage on it. If you play your cards right, you can attack and tank for multiple turns in a row and then heal all of your opponent’s progress to make it a decisive victory for you.
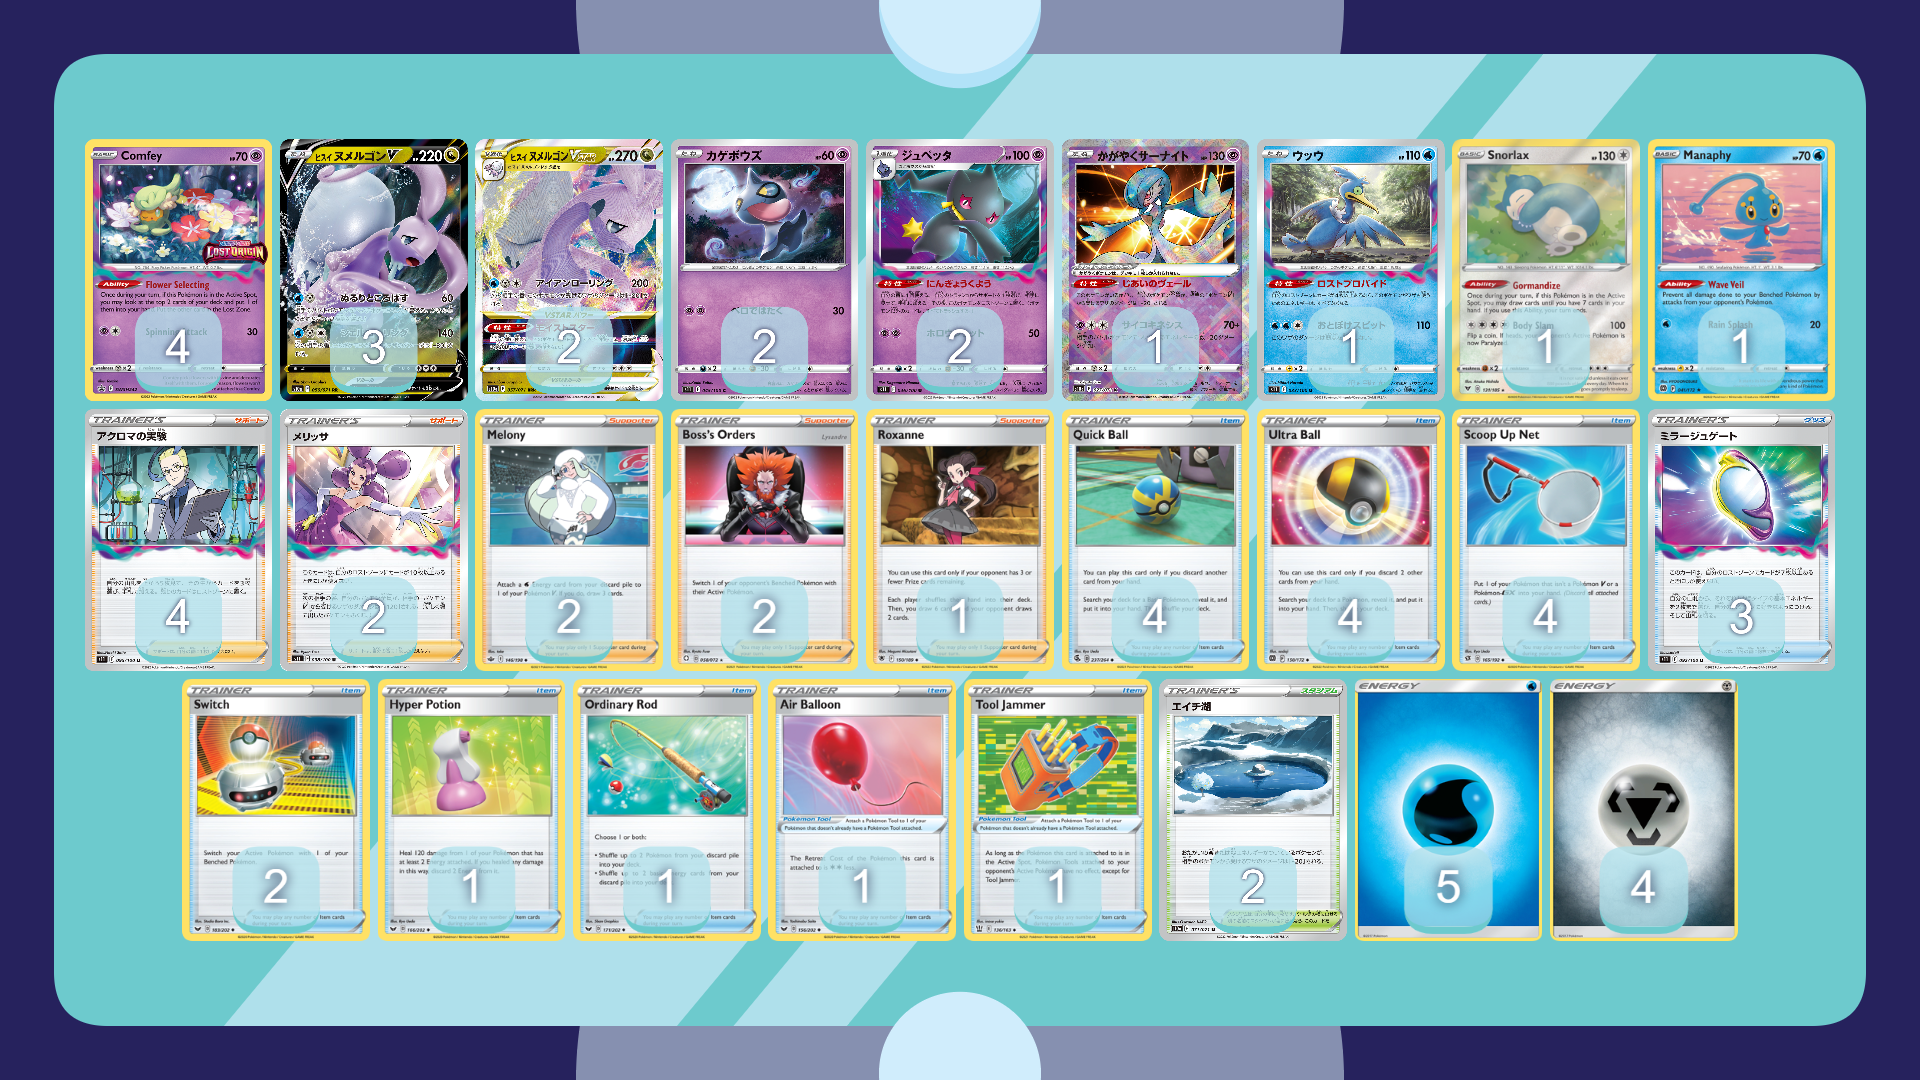
Pokémon
- 3-2 Hisuian Goodra VSTAR
- 1 Radiant Gardevoir
Hisuian Goodra VSTAR is a 270HP Pokémon with the Iron Rollout attack that does 200 damage in addition of making it 80 damage resistant during your opponent’s next turn. If you add it with Radiant Gardevoir, you now take 100 less damage consistently every turn that you attack. In this format where it’s important for a lot of decks to 2-hit-KO or 1-hit-KO a lot of Pokémon, 100 damage reduction is already plan-foiling enough. But with Goodra’s VSTAR POWER – Moisture Star, you can cancel multiple turns of tireless swinging and go back as if they didn’t do anything.
The plan of a Goodra VSTAR deck is to do 200 damage every turn while minimizing damage as much as possible. The biggest problem around it is its attack cost. Charging 3 energies, including 1 Metal and 1 Water, is not a walk in the park. That’s where the Lost Zone engine comes in.
- 4 Comfey
- 1 Cramorant
Comfey is the poster child of the Lost Zone engine. Similarly to Celebrations Mew or Amazing Jirachi, it is a Basic Pokémon that helps you get cards from the top of your deck when it is in the Active Spot. When you look at the top 2 cards of your deck with the Flower Selecting ability, you choose 1 to go in your hand, and the other goes to the Lost Zone. Normally putting a precious card in the Lost Zone is a really bad effect, even with a consistency boost like that, but our deck here will profit from this.
An example of that is Cramorant. It’s also a new Pokémon from the Lost Origin set that can uses it’s 110 damage attack for free if you have 4 cards or more in the Lost Zone. Having a Basic Pokémon that can attack for free in the mid-to-late-game can be really useful against cards like Miltank that are immune to Hisuian Goodra VSTAR, or when you need to take 1 turn for your main attacker to be ready.
- 2-2 Banette
- 1 Snorlax
Banette, again a new card that synergizes with the Lost Zone, is a Stage 1 Pokémon whose ability you can use at anytime. Puppet Memorial can grab you a Supporter card from your discard pile at the cost of putting the Banette and its pre-evolution in the Lost Zone. This is a nice recycling effect and +2 cards in the Lost Zone for you. Reusing supporters will prove to be really efficient for the deck as you’ll see later.
Instead of attacking in the early game, after using a bunch of Flower Selecting abilities, you can end your turn with a draw-up-to 7 with the help of Snorlax from Vivid Voltage. This can prove useful to help you stay in the game after a bad first turn as well. If you want to gamble or trust the consistency of your Goodra deck, you can remove the Snorlax for a Diancie from Astral Radiance for a different effect (giving you more of a protection to your Hisuian Goodra V waiting to evolve).
Trainer and Energy Cards
- 4 Colress’s Experiment
- 2 Melony
Colress’s Experiment will be the second main way of putting cards in the Lost Zone. It makes you look at the top 5 cards of your deck, putting 3 in your hand and 2 in the Lost Zone. Basically a Super-Comfey as a Supporter.
Sometimes, it is possible to attack turn 2 with Goodra if you attached an energy turn 1 to Goodra V, and then Melony + attach for turn to the Goodra VSTAR on turn 2. Melony is also a +3 cards in hand, so it helps getting a good hand in addition of the energy acceleration.
- 2 Fantina
- 1 Roxanne
Once you’ve achieved putting 10 cards in the Lost Zone, the real fun will begin with Fantina. Her card makes all your Pokémon take 120 less damage from Pokémon V. So in addition to Goodra’s attack and Radiant Gardevoir’s ability, you now take 220 less damage from Pokémon V. Loop it with Banette and now you can have an almost endless absurd walling with Hisuian Goodra VSTAR.
Roxanne will be hard to find when needed, but if you manage to find it at the perfect time, or managed to fetch it back from the discard pile with Banette, you can excessively disrupt your opponent other than tanking more damage than necessary.
- 3 Mirage Gate
- 1 Hyper Potion
- 2 Lake Acuity
The last and most important piece of this Lost Zone puzzle. Mirage Gate triggers when you have 7 cards in the Lost Zone, and boosts up the deck’s tempo to 100. Mirage Gate can search your deck for 2 Basic Energy of different types and attach them directly to your Pokémon in any way you like. This is the card we needed to help the weird energy cost of Goodra’s attack. If you managed to put 7 cards in the Lost Zone on turn 2 (2 or 4 from Colress’s Experiment + 2 from Banette + 1 or 3 from Comfey), you can use Mirage Gate and have a ready-to-attack Hisuian Goodra VSTAR! And with Mirage Gate, Hyper Potion is also a really good card. It’s an alternative healing effect that can make a Goodra stick to the active for much longer.
Lake Acuity is the final card that reduces damage for this deck. If any Pokémon has a Water or Fighting Energy, it takes 20 less damage from attacks. This with Fantina, Iron Rollout and Radiant Gardevoir can make your Hisuian Goodra VSTAR take 240 less damage from attacks of Pokémon V (100 less from non-V).
To put it in perspective: Arceus VSTAR with no Double Turbo Energy and Choice Belt deals 0 damage to Hisuian Goodra. Palkia VSTAR with both benches full, a Choice Belt and a Leon used does 80 damage. Mew VMAX with a Choice Belt and 4 Power Tablets used copying Melodious Echo with 4 Fusion Strike Energy in play deals 180 damage after using all their resources. In all of those extreme instances, you can heal it right up with the VSTAR Power or with Hyper Potion. That’s how absurd this deck’s tanking potential is.
- 1 Ordinary Rod
- 1 Tool Jammer
Ordinary Rod is a nice safety net for the deck: if you discarded energies and want to put some in the deck for Mirage Gate, if one of your Goodra got KOed early game and you have some bad prizes, if a sniping deck Boss-KOed your Manaphy, Ordinary Rod will be there for you.
Tool Jammer nullifies Choice Belt that could be worrisome against you. It also cancels Air Balloon, which is a nice roadblock versus some combo decks.
Closing Thoughts
In my opinion, Hisuian Goodra VSTAR is the best Rule Box Attacker from Lost Origin. It has immense tanking potential, 200 damage is good enough damage to 2-hit-KO most evolved V decks, and it has the Comfey and others to help it consistency-wise. Goodra doesn’t need much more than that.
Goodra’s biggest weakness is effect prevention. For example: Duraludon VMAX does 220 damage while ignoring any effects on the defending Pokémon that would reduce damage. So Duraludon VMAX will always 2-hit-KO you, while you 2-hit-KO them. For this specific matchup, I think the player that uses the healing at the best time will be victorious. The Supporter card Phoebe and Mew VMAX’s Max Miracle are also to watch-out for. Path to the Peak is also harsh for the deck, but it’s not a deal-breaker. It only shuts off Radiant Gardevoir’s ability and Goodra’s VSTAR Power.
Thanks for reading!
Get all your Pokemon TCG news at The Bag of Loot! www.thebagofloot.com
Get all your Pokemon TCG needs at Three Kings Loot! www.threekingsloot.com


